
What is GlassFish ?
- GlassFish is a Java application server project created by Sun Microsystems that allows many developers to generate enterprise technologies that are convenient and scalable, as well as additional services that can be installed based on preference.
- It is a free, dual-licensed software under the GNU General Public License (GPL) and the Common Development and Distribution License (CDDL). GlassFish was acquired by Oracle in 2010.
Note : The following discussion consists of Linux command executed on Amazon EC2 . However the same commands can be executed on other distributions like RHEL and CentOs
Prerequisites :
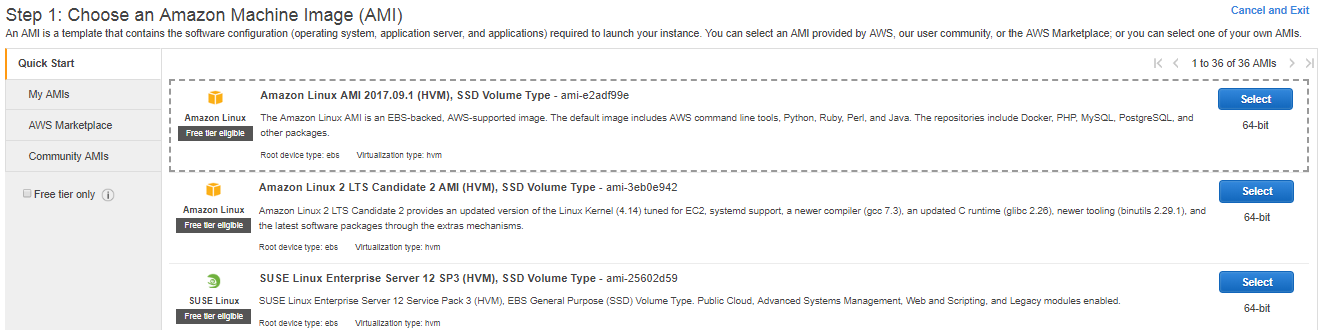
- Create and launch new EC2 machine instance (t2.micro) using the Amazon Linux AMI (see screenshot)
- Once the instance has started, connect to it using putty (On windows) or else SSH using ssh ec2-user@x.x.x.x.x
Once you are ready with instance let’s see how to install Glassfish on our ec2 machine.- Apply a few patches to the machine using ‘sudo yum update’ command.
sudo yum update - If you try and run the ‘javac’ compiler command, you’ll get an error (see screenshot).

This is because only the JRE is installed by default. To rectify this, install the full OpenJDK developer kit. Once done, the ‘javac’ command should be available. Glassfish will need this later.
sudo yum install java-1.8.0-openjdk-devel

- Download Glassfish 4.1.1 & unzip it to the current location. Yon’t need sudo for these steps. If you use sudo, the domain won’t start properly if at all.
wget -c http://download.oracle.com/glassfish/4.1.1/release/glassfish-4.1.1.zip
unzip glassfish-4.1.1.zip
Once you run above commands, your ‘ll’ command should give you following output

- Configure Glassfish security so that you can use the built in web console. To do this we have to start the default domain, change the admin password, enable the secure admin feature and restart glassfish. To do all these things we need to start the ‘asadmin’ program that comes with glassfish…./glassfish3/glassfish/bin/asadmin (see [ Image 1 ] )
asadmin> start-domain
asadmin> change-admin-password (initial is username:admin, password:[enter]) (see [ Image 2 ] )
asadmin> enable-secure-admin (use the admin username and password which you just set)
asadmin> restart-domain
asadmin> exit
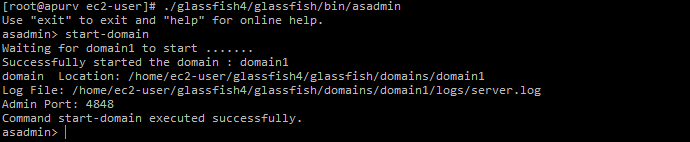
[Image 1]
[Image 2] - Open some ports for the EC2 instance security group so that you can see applications and the Glassfish console. Find the security group being used for your EC2 machine instance and enable ports 8080, 8181 and 4848 as per the following screenshot

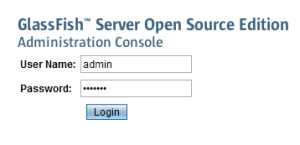
- You should now be able to login to your Glassfish console. Find the ‘Public DNS’ name for this EC2 machine instance on the My Instances ‘details page’. Pop this address into a browser and append the Glassfish admin console port number on the end (4848). This will look like http://ec2-x-x-x-x.ap-southeast-2.compute.amazonaws.com:4848/ and after a few minutes (while the console starts) the console login screen should appear as per the screenshot below.
You should now be able to login using the admin username and password that you setup earlier and deploy applications to the Glassfish server. If you are new to Glassfish, try the Glassfish Quick Start Guide.
- Apply a few patches to the machine using ‘sudo yum update’ command.
Optional Steps: Deploying the ‘Hello Duke’ sample web-app
Step 1. Stop the Glassfish server. From the asadmin program…
asadmin> stop-domain
asadmin> exit
Step 2. Move to the autodeploy folder and download the sample application to it.
cd glassfish3/glassfish/domains/domain1/autodeploy
wget -c http://glassfish.java.net/downloads/quickstart/hello.war ( See [Image 3] )

Step 3. Start the Glassfish server. From the asadmin program…
asadmin> start-domain
Step 4 : Try the sample application in your browser.
http://ec2-x-x-x-x.ap-southeast-2.compute.amazonaws.com:8080/hello
Finally, in your browser window, you should now see Java Duke and he’s asking you for your name…

Conclusion :
- If you follow above steps carefully, it is quite easy to install GlassFish4 on EC2 machine. Now you can use GlassFish for Java EE enterprise applications.
- It supports JMS, JavaServer Pages, Enterprise JavaBeans, RMI, JPA and servlets.
- Because of its nature, developers (you) can create scalable and portable applications that easily integrate with legacy systems and technologies.